Photos have become an essential part of our daily lives. Whether you are sharing pictures on social media, using images for your business, or keeping personal memories, having clear and high-quality photos makes a big difference. However, not everyone has the skills or time to use professional photo editing software. Luckily, free image enhancers make it easy to upgrade your photos in just a few clicks.
These tools can automatically fix problems like blurry areas, dull colors, or poor lighting, helping you make your pictures look sharper and more attractive. In this article, we will guide you step by step on how to use a free image enhancer to improve your photos quickly and easily.
What is a Free Image Enhancer?
A free image enhancer is a tool or app that improves the quality of your pictures without the need for advanced editing skills. It can fix blurry images, adjust brightness, enhance colors, and remove noise or grain from your photos. Many of these enhancers use artificial intelligence (AI) to detect problems and automatically make improvements.
Unlike manual editing software, where you need to adjust every setting yourself, a free image enhancer simplifies the process. You can make professional-looking photos in seconds, even if you have never edited a picture before. Plus, since it is free, you can try it without spending money on expensive software.
Key Features of Free Image Enhancers
Before using a free image enhancer, it is helpful to know what features to look for:
- Auto-enhancement and AI adjustments: The tool can automatically fix your photo based on its quality and content.
- Noise reduction and sharpening: This makes blurry or grainy images appear clearer and more detailed.
- Brightness, contrast, and color correction: Adjusting these elements can make a dull photo vibrant.
- Background editing or removal: Some tools let you remove or replace backgrounds easily.
- User-friendly interface: The app should be simple to use so beginners can enhance photos without difficulty.
These features allow you to improve almost any photo, whether it is a selfie, a landscape, or a product image for your business.
Step-by-Step Guide: How to Use a Free Image Enhancer
1. Choose the Right App or Tool
Start by selecting a free image enhancer that suits your needs. Popular options include Remini, Fotor, Pixlr, Snapseed, and Adobe Express. Consider factors like ease of use, platform (mobile or desktop), and the features offered.
2. Upload Your Photo
Next, upload the photo you want to improve. For the best results, use a high-resolution image. This allows the app to make detailed adjustments and maintain quality.
3. Select Auto-Enhancement or Manual Adjustments
Many free image enhancers offer an automatic enhancement feature. This is ideal for beginners or when you want a quick improvement. If you prefer more control, you can manually adjust brightness, contrast, sharpness, and color settings.
4. Adjust Key Settings
If you choose manual adjustments, focus on key settings:
- Brightness: Makes the photo lighter or darker.
- Contrast: Adds depth to the image and makes colors stand out.
- Sharpness: Makes edges and details clearer.
- Color saturation: Enhances the intensity of colors to make the image look more vibrant.
These adjustments help bring out the best in your photo while keeping it natural.
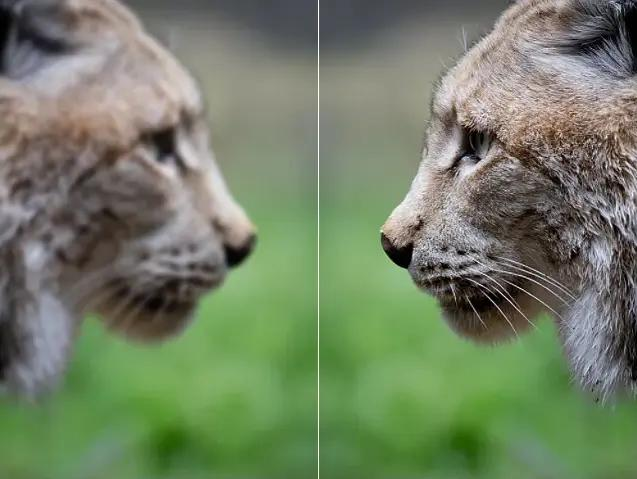
5. Preview and Compare
Before saving, preview your edited photo. Many apps allow you to compare the original and enhanced versions side by side. This helps you see the difference and decide if any further adjustments are needed.
6. Save and Share Your Upgraded Photo
Once satisfied, save your photo in the right format. JPEG is ideal for sharing on social media, while PNG preserves more detail for professional use. You can now share your upgraded photo online, send it to friends, or use it for business purposes.
Tips for Getting the Best Results
- Always use the highest resolution photo available.
- Avoid over-editing to keep your photo looking natural.
- Try combining multiple apps for different enhancements. For example, one app can sharpen details, while another can improve colors.
- Explore new free tools regularly, as technology and AI improvements make enhancers better over time.
Who Can Benefit from Using Free Image Enhancers?
Free image enhancers are useful for a wide range of people:
- Social media creators: They can make their posts more eye-catching.
- Small business owners: High-quality product photos attract more customers.
- Students and professionals: Enhance images for presentations or projects.
- Everyday users: Improve family photos, travel pictures, or event snapshots with ease.
Conclusion
Using a free image enhancer is an easy and effective way to upgrade your photos. Whether you want to fix a blurry selfie, brighten a dull image, or restore an old picture, these tools make the process simple and quick. With the right app, even beginners can achieve professional-looking results without spending money or learning complex editing techniques.
If you want a simple and reliable way to improve your photos, trying a Free Image Enhancer is a great first step. With just a few clicks, your pictures can become sharper, clearer, and more visually appealing, ready to share with the world.