Garbage disposal installation is one of the most practical upgrades you can make in your kitchen. A properly installed garbage disposal unit makes cleaning up after meals easier, reduces food waste, and helps keep your kitchen plumbing running smoothly. While many homeowners hire professionals, understanding the process can help you make informed decisions, whether you choose DIY or expert installation.
We’ll walk through what garbage disposal installation involves, the benefits, basic steps, and important considerations to ensure your unit works safely and efficiently.
Why Install a Garbage Disposal?
Before diving into the installation process, it’s helpful to understand why garbage disposals are so popular.
Convenience
A garbage disposal allows you to grind small food scraps directly in your sink. Instead of scraping plates into the trash, you can rinse them clean quickly.
Reduced Kitchen Odors
Food sitting in your garbage can cause unpleasant smells. With a disposal, many scraps are washed away immediately, helping keep your kitchen fresher.
Environmental Benefits
Some wastewater treatment facilities can process ground food waste into energy or fertilizer. This means your garbage disposal installation could contribute to more sustainable waste management.
Fewer Drain Clogs
When used correctly, a garbage disposal can help prevent large food particles from building up in your pipes.
What to Know Before Garbage Disposal Installation
Not every kitchen is automatically ready for a garbage disposal. Here are a few things to check first:
Sink Compatibility
Most standard sinks can accommodate a disposal, but farmhouse or specialty sinks may require modifications.
Electrical Access
Garbage disposals need a power source. You’ll either need an outlet under the sink or hardwiring by a qualified electrician.
Dishwasher Connection
If your dishwasher drains through the sink plumbing, your garbage disposal installation may need a dishwasher inlet connection.
Local Plumbing Codes
Some areas have specific rules about food waste disposals. It’s always wise to check local regulations or consult a plumber.
Tools and Materials Needed
If you’re planning a DIY garbage disposal installation, gather the following:
- Garbage disposal unit
- Mounting assembly (usually included)
- Plumber’s putty
- Screwdriver
- Adjustable wrench
- Pliers
- Bucket and towels (for water spills)
Having everything ready before you start will make the process much smoother.
Step-by-Step Garbage Disposal Installation
While every model is slightly different, most installations follow similar steps.
1. Turn Off Power and Water
Safety first. Shut off electricity at the breaker and turn off the water supply to the sink.
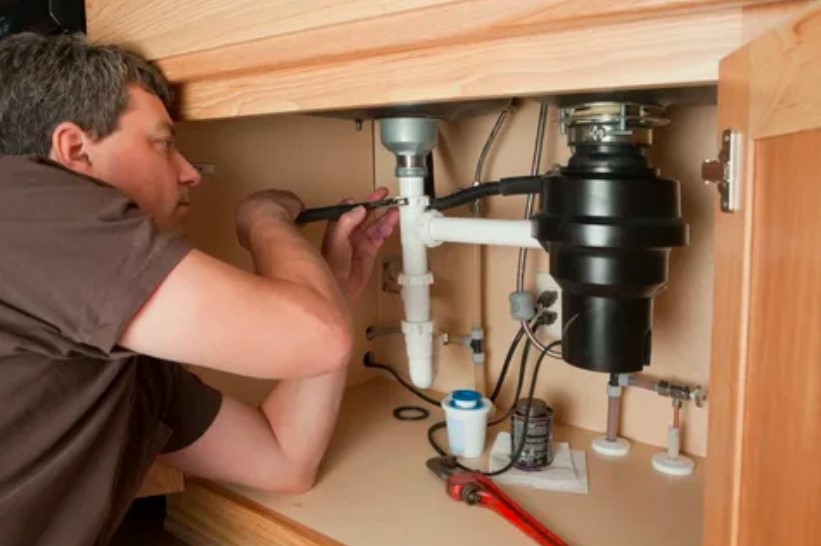
2. Remove the Old Drain Assembly
Place a bucket under the sink to catch water. Disconnect the P-trap and existing drain fittings. Remove the old sink strainer.
3. Install the Mounting Assembly
Apply plumber’s putty around the sink opening. Insert the new drain flange from above and secure it underneath with the mounting ring and screws provided. This part holds the disposal in place.
4. Prepare the Disposal Unit
If connecting a dishwasher, knock out the dishwasher inlet plug inside the disposal. Attach the electrical cord if your unit uses a plug-in connection.
5. Attach the Disposal
Lift the disposal unit and align it with the mounting assembly. Twist it into place until it locks securely. This can be heavy, so you may want a helper.
6. Connect the Drain Pipes
Attach the discharge tube from the disposal to the drainpipe. Reconnect the P-trap and ensure all connections are tight but not overtightened.
7. Wire the Unit
If hardwiring, connect the wires according to the manufacturer’s instructions. If using a cord, simply plug it into the outlet.
8. Test for Leaks and Operation
Turn the water back on and check for leaks. Restore power and run the disposal with cold water to ensure it operates smoothly.
Safety Tips After Installation
Once your garbage disposal installation is complete, proper use is key.
- Always run cold water while using the disposal
- Avoid putting fibrous foods (like celery), grease, bones, or coffee grounds down the unit
- Never put your hand inside the disposal
- Use tongs or pliers to remove visible objects
Regular maintenance, such as grinding ice cubes or citrus peels, can help keep the blades clean and reduce odors.
When to Call a Professional
DIY garbage disposal installation can save money, but some situations call for expert help:
- No existing electrical outlet under the sink
- Leaking or damaged plumbing
- Complex sink or countertop setups
- Uncertainty about local building codes
A licensed plumber or electrician can ensure everything is installed safely and up to code.
FAQs About Garbage Disposal Installation
Q1: How long does garbage disposal installation take?
For a straightforward replacement, installation usually takes 1–2 hours. New installations with electrical work may take longer.
Q2: Can I install a garbage disposal myself?
Yes, many homeowners can handle basic garbage disposal installation. However, electrical wiring and complex plumbing should be handled by professionals.
Q3: Do all sinks support garbage disposals?
Most standard kitchen sinks do, but some materials or designs may require special fittings or reinforcement.
Q4: What size garbage disposal do I need?
For a small household, a 1/3 or 1/2 horsepower unit is often enough. Larger families may benefit from a 3/4 or 1 horsepower model.
Q5: How do I maintain my garbage disposal?
Run cold water during use, avoid hard or fibrous foods, and clean it regularly with ice cubes or baking soda and vinegar.
Conclusion
A Electrical troubleshooting is a smart investment that adds convenience and efficiency to your kitchen. Whether you choose a DIY approach or hire a professional, understanding the process helps you ensure the job is done right. With proper installation and regular maintenance, your garbage disposal can provide years of reliable service while keeping your kitchen cleaner and more environmentally friendly.