A healthy lawn starts with proper turf installation and careful ground preparation. Instant turf creates an immediate green space, but long-term results depend on correct groundwork. When homeowners understand how to properly install instant turf, the grass establishes strong roots and grows evenly across the lawn.
Measure the Lawn Area
Accurate measurements are key to successful turf installation and delivery. Measure the lawn’s length and width in metres, then multiply to find the total area. Order slightly more turf to cover trimming around garden beds, pathways, and curves. Mark pathways, driveways, and beds before delivery to guide placement and make the installation process smoother and more manageable.
Prepare the Site
Before starting how to install instant turf, the lawn area should be cleared and prepared properly. Key preparation steps include:
- Remove existing grass, weeds, and plant roots from the surface.
- Clear stones, sticks, and other debris that may affect turf placement.
- Apply weed control several days before installation if weeds are present.
- Rake the soil surface to remove leftover roots and small rocks.
- Mark pathways, garden beds, and irrigation zones clearly.
Prepare the Soil Base
Soil preparation plays an important role in successful turf installation, as strong roots require healthy soil conditions. Important soil preparation steps include:
- Loosen the top layer of soil using a rake or garden fork.
- Remove compacted soil patches, rocks, and leftover debris.
- Add sandy loam or organic compost to improve soil quality.
- Spread the soil evenly across the area using a rake.
- Keep the soil level about 20–25 mm below pathways or driveways.
Install Irrigation if Needed
Irrigation systems help maintain moisture during the early growth stage. Many homeowners install sprinklers before starting turf installation to avoid disturbing the lawn later. Installing irrigation first allows pipes and sprinkler heads to remain hidden beneath the turf. Position sprinkler heads carefully so water spreads evenly across the lawn. Uneven watering can cause dry patches and affect grass growth. Test the irrigation system before placing the turf to ensure proper coverage.
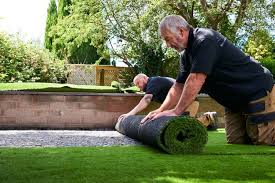
Lay the Instant Turf
The next step in installing instant turf is to place turf rolls evenly across the prepared soil surface.
- Begin laying turf along a straight edge such as a driveway, path, or fence.
- Place each turf roll tightly against the previous piece to prevent gaps.
- Arrange the joints in a staggered pattern similar to brickwork.
- Press the turf gently to ensure firm contact with the soil surface.
- Trim edges neatly around trees or garden beds using a sharp knife.
- Install the turf on the same day it arrives to maintain freshness.
Water the Turf Immediately
Watering plays a critical role after turf installation, as moisture supports early root development. Apply water immediately after laying the turf so moisture reaches the soil underneath. During the first two weeks, keep the soil consistently moist to encourage root establishment. Once the turf establishes, reduce watering gradually to promote deeper root growth.
Early Care and Maintenance
Early care determines how well the turf establishes during the first few weeks. Important maintenance practices include:
- Avoid heavy foot traffic during the first two weeks.
- Water the lawn regularly to maintain consistent soil moisture.
- Begin mowing once the turf roots firmly attach to the soil.
- Apply fertiliser after the grass begins active growth.
Understanding how to install instant turf also involves maintaining the lawn properly after installation.
Conclusion
Long-lasting lawns depend on careful turf installation and consistent early care. Proper measurement, soil preparation, and correct turf placement support healthy root growth. When homeowners understand how to install instant turf and follow these steps, they create a durable lawn that remains healthy year-round.